In the previous article we saw how to build the Smart.js framework and flash the firmware in the ESP8266 device. Now is time to play a little more with it.
In this article I will show how to read the temperature and the humidity from a DHT11 sensor connected to the ESP8266 device and how to send those values to a public site using an HTTP GET request, all using JavaScript code.
How to add new files to the firmware
To add a new file to the firmware add it in the smart.js/platforms/esp8266/fs folder. All the files in the fs folder are added to the file system of the firmware during the build process. Those file will be accessible using the File API.
Lets try it creating a file myfirst.js with the following code:
//print the Hello World message
function sayHello() {
   print('Hello World');
};

//print my external IP
function getMyIp() {
 Http.get("http://jsonip.com", function(data, error) {
   if (error) {
     print("error ", error);
   } else {
     print("my ip is ", JSON.parse(data).ip);
   }
 });
};
Now save the file and run the firmware build process:
sh make.sh
Connect the ESP device as explained before and flash the new firmware.
In the console we can now load and evaluate our JavaScript file using the eval function from the File API:
File.eval('myFirst.js');
The code in the file is evaluated and the functions that we have defined can now be called:
smartjs 29592/2268$ sayHello();
Hello World
undefined
The sayHello method prints the “Hello World” message visible in the output area. Instead the “undefined” value is the value returned by the function and printed by default. Let’s try the other function getMyIp:
smartjs 29408/2160$ getMyIp();
undefined
smartjs 26728/1956$ error cannot resolve
The execution terminates with an error message, this happens because the WiFi is not configured. We can configure it using the Wifi API:
Wifi.setup('yourssid', 'yourpassword');
The setup function will make the ESP device scan for the specified network and connect to it. If everything go fine the method return the true value.
The Wifi API offers also a method to check the current Wifi status:
smartjs 29384/2160$ Wifi.status()
got ip
Now that the Wifi is configured we can try the getMyIpFunction:
smartjs 28752/1860$ getMyIp();
undefined
smartjs 25656/1860$ my ip is 86.12.19.195
The printed IP is our external IP, the one of our modem. If, instead, we want the internal IP, the one assigned by our access point, simply call Wifi.ip(). Now we are able to write our program and execute it. Time to read values from a DHT11 sensor.
Wiring the DHT11
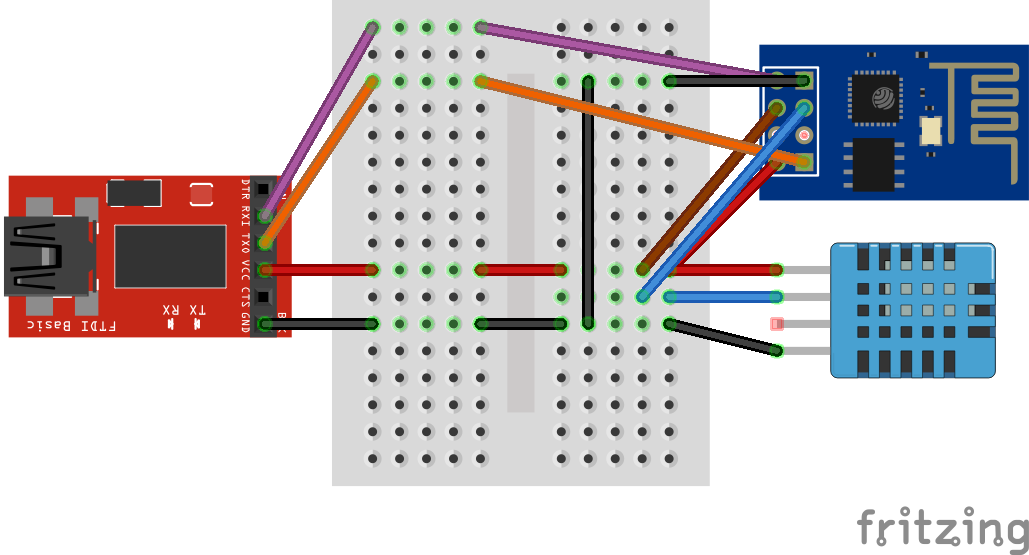
To read the sensor values we will use the only available pin in the ESP device the GPIO_02. First connect the VCC and GND pins of the sensor to the respective VCC and GND on the USB adapter. Then connect the DATA pin to the ESP GPIO_02 pin. Note that the GPIO_0 is NOT connected to the GND.

Now connect the USB adapter to the computer and click the “connect” button on the Flash’n’Chips tool. I don’t know why but sometime I have to disconnect the sensor DATA pin before turn on the ESP device otherwise the ESP console don’t reply.
The framework comes with the support for the DHT11 sensor, a global object DHT11 is defined with a read function. The function takes an integer as input, the sensor port, in our case is the number 2.
We can use the DHT11 object simply calling his read method:
smartjs 29584/2268$ DHT11.read(2);
{"rh":61,"temp":22}
The returned value is an object with temperature and relative humidity. Time to publish the sensor values.
Publish the sensor values
We will publish the sensor values in a site that accepts a GET request with the values as url parameters, something like http://mysite.com/publish.php?temperature=22.0&humidity=55.0
Create a sensor.js file in the fs folder with the following code:
function readSensor() {

  //read the sensor data
  var data = DHT11.read(2);

  //compose the GET url
  var url = "http://mysite.com/publish.php?temperature="+data.temp+"&humidity="+data.rh;

  //do the GET
  Http.get(url, function(data, error) {
    if (error) {
      print("error ", error);
    } else {
      print("data published");
    }
  });
};
Build the firmware with the new file. Before flash the device re-connect the GPIO_0 to the GND and disconnect the sensor DATA pin. After the flash is complete disconnect the adapter e disconnect the GPIO_0 from the GND.
Connect the adapter to the computer, then click the “connect” button in the Flash’n’Chips tool. After the console is connected re-connect the DATA pin.
First, setup the WiFi:
Wifi.setup('yourssid', 'yourpassword');
Then load and evaluate the sensor code:
File.eval('sensor.js');
We can now run our method readSensor. It will read the values from the sensor and publish them to a site using the HTTP API. Here the console output:
readSensor();
undefined
smartjs 25656/1860$ data published
And a chart built using the published values:
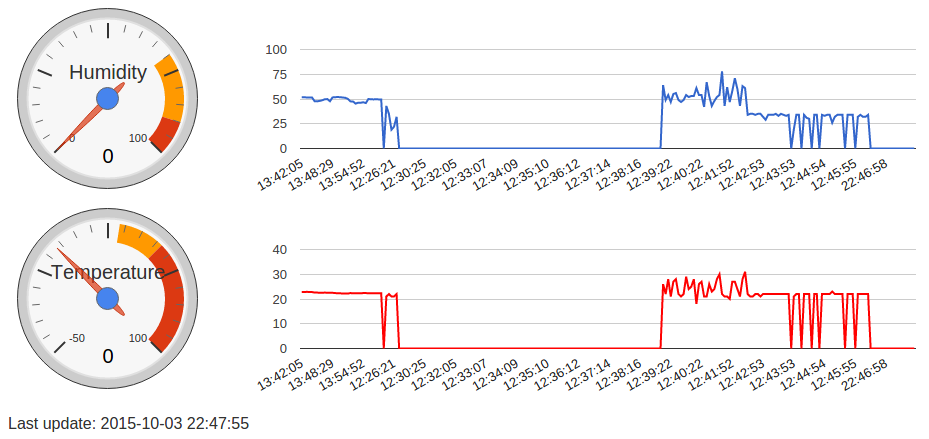
So our little ESP device is able to read values from a sensor and publish them in a site using the Wi-Fi network.
Continuous and automatic publication
What if we want a continuous publication of sensor values? Here the solution:
function streamSensorData() {
  readSensor();
  setTimeout(streamSensorData, 5000);
};
This method will publish the sensor data every 5 seconds.
What if we want to start the publication automatically without the need to run it from a console? Here the solution.
First append those lines to the sensor.js code:
if (Wifi.status() === "idle") Wifi.setup('yourssid', 'yourpassword');
streamSensorData();
The first line checks if the WiFi is active otherwise setups it. The second line starts the data streaming.
In order to make our sensor.js file evaluated at boot time we need to modify the user.js file under smart.js/src/js folder appending this line:
File.eval('sensor.js');
Build and flash the firmware. After rebooting the device it will start to publish the sensor values.
Conclusions
We saw how to run our JavaScript code in our ESP device thanks to the great work from Cesanta. The framework is still under development so the APIs or the tools can change in any moment.
I think there will be for sure a lot of news in the coming months. One thing will be the integration of the web server Mongoose in the Smart.js framework, that means connecting directly to the device using the browser! Another thing, as I can understand from the Smart.js online dashboard, is that we will be able to upload our JavaScript code directly from our browser so we don’t need to flash the firmware every time we update the code!!!